Mailorbit
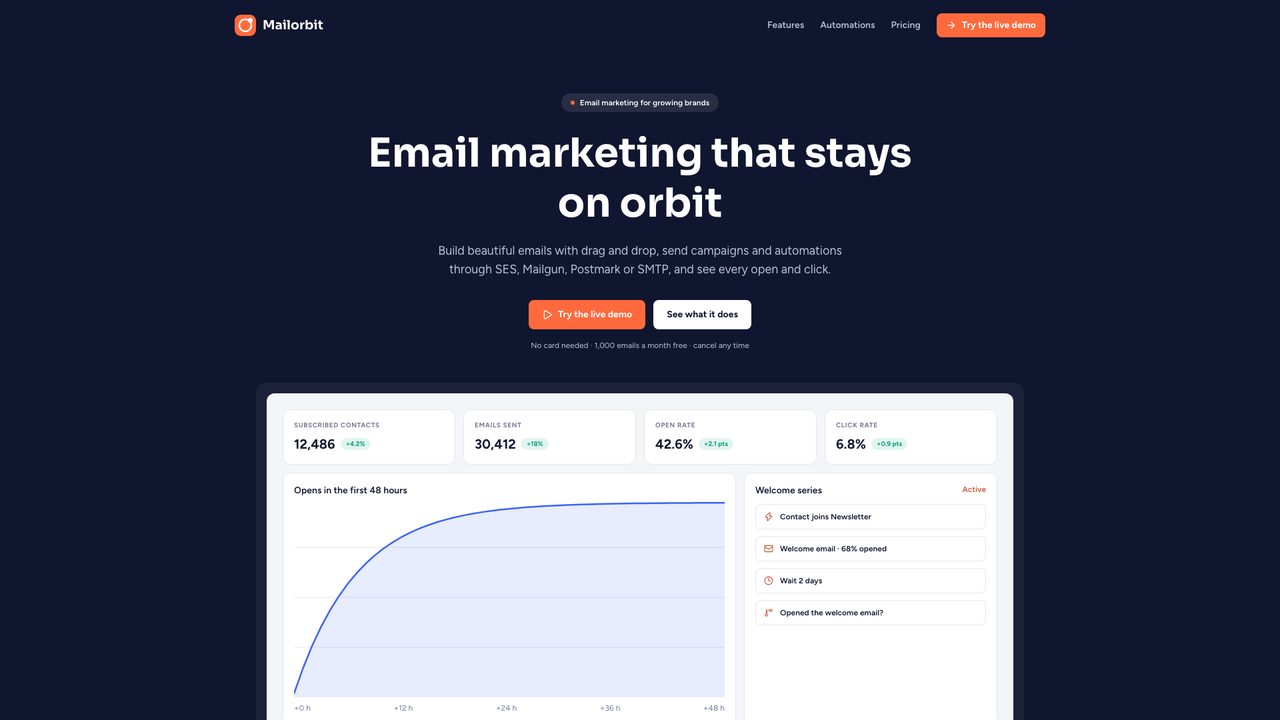
Self-hosted email marketing and newsletter SaaS. Your customers build lists, design emails with drag and drop, send campaigns and automations, and see every open and click. You run the platform, set the plans and get paid.
Version 1.0.0 · released 2026-10-16 · Next.js 16, React 19, TypeScript, Prisma 7 and PostgreSQL.
1. Welcome
Thank you for buying Mailorbit. This guide takes you from the download to a running email marketing platform on your own domain. You do not need to write code: you fill in a settings file, run one command, and finish the setup in your browser.
What is in the box
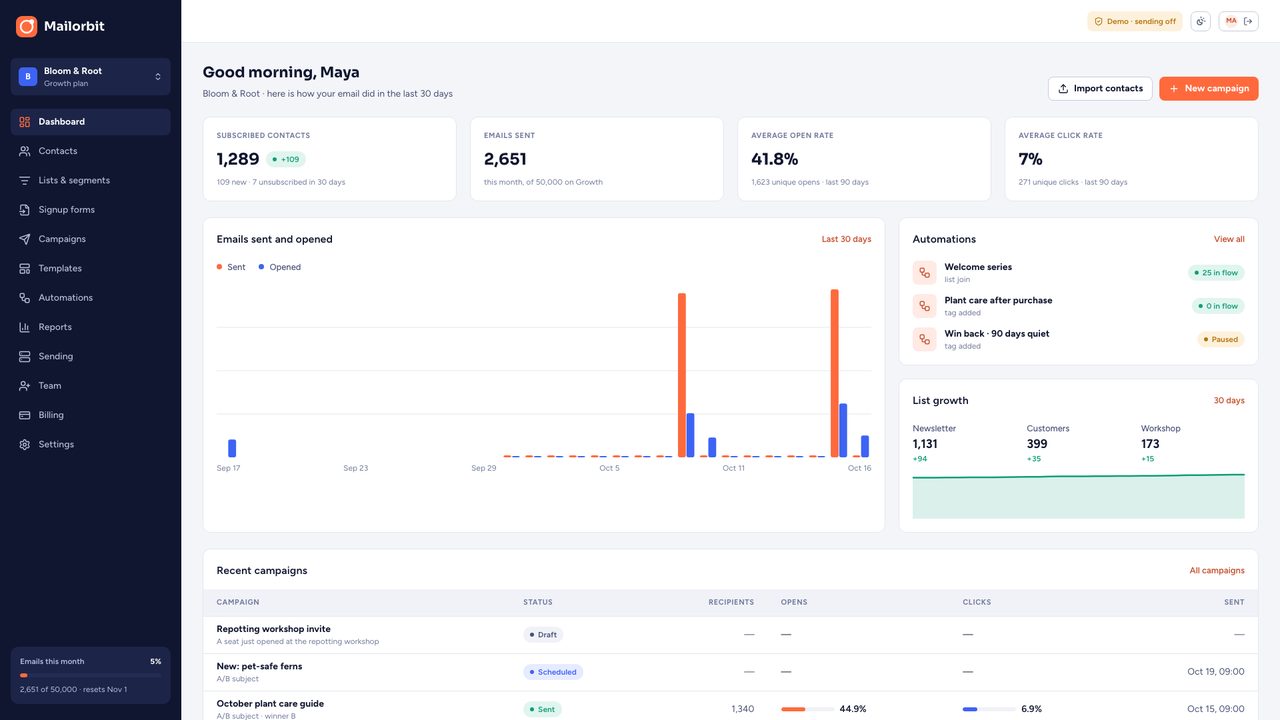
- The app your customers use (each customer has a workspace): dashboard, contacts, lists and segments, CSV import, signup forms, email templates with a drag-and-drop builder, campaigns with A/B subject tests and scheduling, automations, reports, sending servers, team and billing.
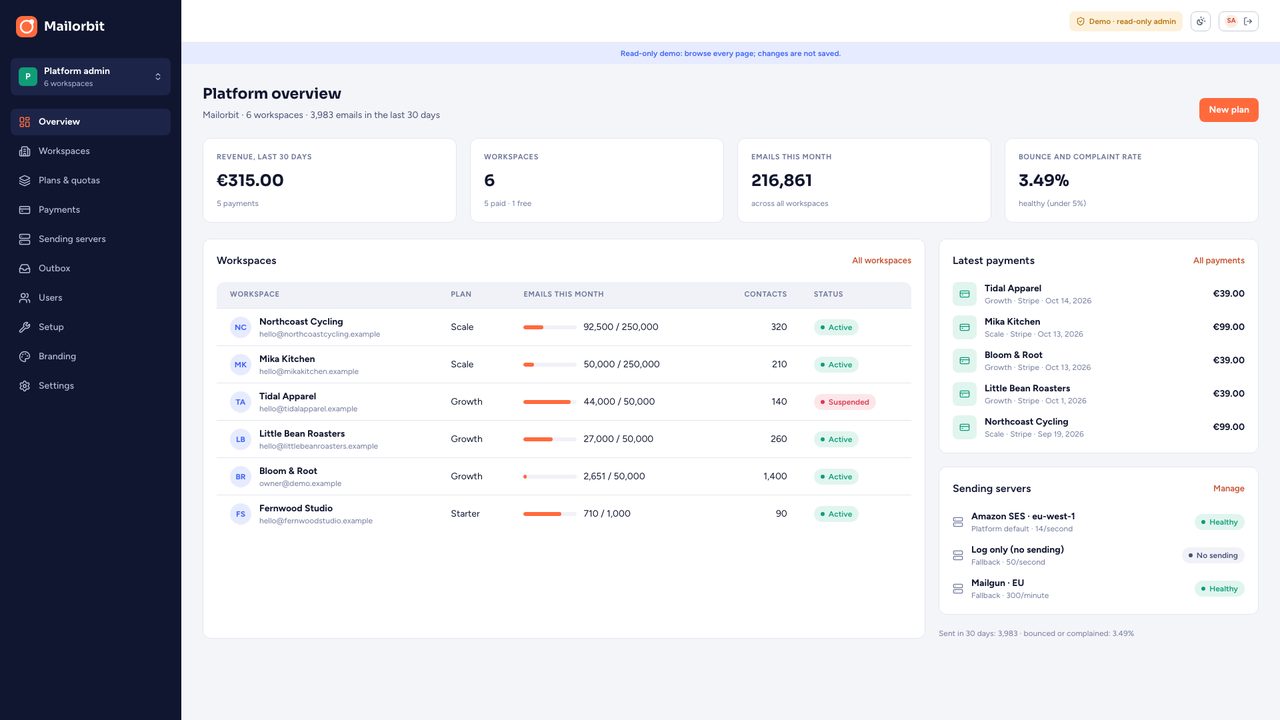
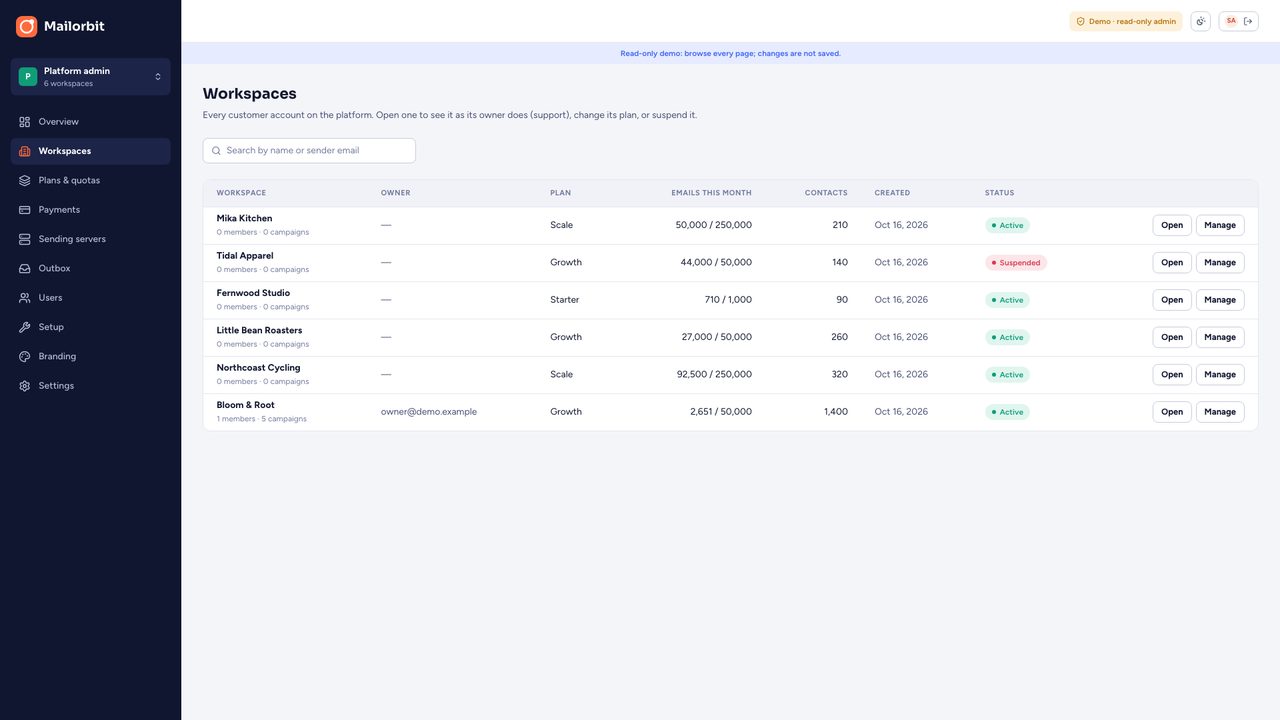
- The admin panel for you, the platform owner: workspaces, plans and quotas, payments, platform sending servers, the outbox, users, a setup page that tests every key, branding and platform settings.
- The public site: a landing page with your plans, sign-up and sign-in, hosted signup forms, unsubscribe and confirmation pages.
- A background worker that sends email at each server's rate limit, runs schedules and automations, picks A/B winners and imports CSV files.
- A Docker Compose stack (app, worker, PostgreSQL and optional automatic HTTPS), an install wizard and sample data.
Screenshots
2. Requirements
| What | Version | Notes |
|---|---|---|
| A server (VPS) | 1 GB memory, 1 CPU, 10 GB disk | 2 GB or more for large lists. Any Linux VPS (Ubuntu 24.04 recommended): Hetzner, DigitalOcean, Vultr, Linode, AWS Lightsail… |
| Docker with Compose | Docker 24+, Compose v2 | The recommended way. Installs PostgreSQL for you. |
| Or: Node.js and PostgreSQL | Node.js 22+, pnpm 10+, PostgreSQL 14+ | For running without Docker (section 6). |
| A domain | — | For example mail.yourdomain.com for the app. Tracking links, signup forms and unsubscribe pages use it. |
| An email provider | — | Optional at first (Log only). For real sending: any SMTP service, Amazon SES, Mailgun or Postmark. |
| Browser | Current Chrome, Edge, Firefox or Safari | For you and your customers. |
Third-party services
Mailorbit runs on your own server and needs no outside service to start. These optional services are run by other companies. Each provider has its own pricing and terms, and you pay them directly; nothing is included in the price of Mailorbit. Create your own account with each one you want to use.
| Service | Used for | Needed? | Where to sign up |
|---|---|---|---|
| Amazon SES | Sending email (low cost per thousand emails) | Optional (one sending provider is needed to send real email) | aws.amazon.com/ses |
| Mailgun | Sending email | Optional | mailgun.com |
| Postmark | Sending email | Optional | postmarkapp.com |
| Any SMTP service | Sending email (Brevo, SendGrid, SMTP2GO, your host's mail server…) | Optional | Your provider |
| Stripe | Taking card payments for your plans | Optional (without it, plan changes use a demo payment) | stripe.com |
| A VPS host and a domain | Running the app | Yes, for a public platform | Any provider |
Mailorbit does not load anything from a third-party server in the browser: fonts and icons are bundled.
3. Quick start (Docker)
This puts Mailorbit on your computer or server in about ten minutes. You need Docker (docs.docker.com/engine/install).
- Unzip the download and open the
deployfolder in a terminal:cd mailorbit/deploy cp .env.example .env - Open
.envin a text editor and fill in three things:POSTGRES_PASSWORD: a database password of your choice (letters and digits only).APP_SECRET: a long random string. Make one withopenssl rand -base64 32.APP_URL: the address you will open, for examplehttp://localhost:3000on your computer orhttps://mail.yourdomain.comon a server.
- Start everything:
The first start builds the app (3–6 minutes). It then starts PostgreSQL, applies the database migrations, adds the base data (plans, starter templates, the Log only sender), and starts the web app and the worker.docker compose up -d - Open
APP_URLin your browser. The install wizard opens (section 4).
docker compose ps shows postgres, web and worker as running (migrate exits after it finishes). Logs: docker compose logs -f web worker.4. Install wizard and sample data
The first visit to your address opens /install. It has four steps:
- Server check: the database answers and migrations are applied, the worker runs, and
APP_SECRETis long enough. - Your platform: the platform name (shown everywhere, change it later in Branding), the system email address (password resets, invitations, confirmations) and the currency for plans.
- Admin account: your name, email and password. This is the platform admin.
- Sample data: a sample workspace (a plant shop with contacts, three sent campaigns with reports, automations and signup forms) so every screen is filled in. Leave it on to explore; delete it later in Admin → Workspaces → Manage → Delete.
After the wizard you land in the admin panel. The wizard closes itself once an admin exists; it cannot be run again.
5. Put it online (VPS, HTTPS)
Option A: the bundled HTTPS (simplest)
- Point your domain at the server: create an A record for
mail.yourdomain.comwith the server's IP address at your DNS provider. - In
deploy/.envsetDOMAIN=mail.yourdomain.comandAPP_URL=https://mail.yourdomain.com. - Make sure ports 80 and 443 are free and open in the firewall, then run:
Caddy gets and renews a free Let's Encrypt certificate on its own.docker compose --profile https up -d
Option B: your own reverse proxy
If the server already runs nginx, Traefik or Caddy, keep WEB_PORT (default 3000) and proxy your domain to http://127.0.0.1:3000. Example for nginx:
server {
  server_name mail.yourdomain.com;
  location / {
    proxy_pass http://127.0.0.1:3000;
    proxy_set_header Host $host;
    proxy_set_header X-Forwarded-For $proxy_add_x_forwarded_for;
    proxy_set_header X-Forwarded-Proto $scheme;
    client_max_body_size 20m;
  }
}APP_URL to the public https address before you send real email. Every tracking link, image, signup form and unsubscribe link in your emails is built from it.Backups
Everything lives in two Docker volumes: postgres-data (the database) and uploads (images used in emails and logos). Back up the database every night, for example:
docker compose exec -T postgres pg_dump -U mailorbit mailorbit | gzip > mailorbit-$(date +%F).sql.gz6. Without Docker
Mailorbit is a standard Next.js app plus a worker process. You can run it on any host that keeps a Node.js process running (a VPS with PM2 or systemd, Railway, Render, Fly.io…).
- Create a PostgreSQL 14+ database.
- In the
webfolder:cp .env.example .envand fill inDATABASE_URL,APP_URLandAPP_SECRET. - Install, migrate and build:
pnpm install pnpm prisma:migrate:deploy pnpm prisma:seed -- --base pnpm build - Run two processes and keep both running:
pnpm start      # the web app (port 3000; set PORT to change it)
pnpm worker     # sending, schedules, automations, imports
7. Sending email
Email leaves Mailorbit through sending servers. There are two kinds:
- Platform servers (Admin → Sending servers): yours. Every workspace uses the platform default unless it has its own. System emails (password resets, invitations, double opt-in confirmations) also go through it.
- Workspace servers (App → Sending): a customer connects their own provider, if their plan allows it ("Own sending servers" on the plan).
Providers
| Provider | What to fill in | Where to find it |
|---|---|---|
| Log only | Nothing | The default. Emails go to Admin → Outbox and the worker log; nothing is sent. |
| SMTP | Host, port (587 with STARTTLS or 465 with SSL), username, password | Your email provider's SMTP settings page. |
| Amazon SES | AWS region, access key ID, secret access key, configuration set (optional) | AWS console → IAM: create a user with the ses:SendEmail and ses:SendRawEmail permissions and an access key. Verify your domain in SES and request production access (new accounts start in the sandbox). |
| Mailgun | Sending domain, region (US or EU), API key | Mailgun → Sending → Domains, and API Security for the key. |
| Postmark | Server API token, message stream (use a broadcast stream for newsletters) | Postmark → your server → API Tokens. |
Each server has a rate limit (emails per second). The worker never sends faster than that, so you stay inside your provider's limits. Use Test on a server to send a test email before you make it the default.
Provider passwords and keys are stored encrypted with APP_SECRET. They are never shown again after you save them.
Domain records (SPF, DKIM, DMARC)
Inbox providers trust email from a domain that proves it allowed the sender. For the domain in your From address, add the records your provider gives you:
- SPF: a TXT record that lists your provider (for example
v=spf1 include:amazonses.com ~all). - DKIM: the TXT or CNAME records from your provider's domain verification page.
- DMARC: a TXT record on
_dmarc.yourdomain.com, for examplev=DMARC1; p=none; rua=mailto:you@yourdomain.com.
Every campaign email already carries an unsubscribe link, a List-Unsubscribe header with one-click unsubscribe (required by Gmail and Yahoo for bulk senders), and the workspace's postal address in the footer.
Bounces and complaints
When an address does not exist or someone marks an email as spam, the provider can tell Mailorbit, which then stops emailing that contact. The webhook addresses are shown on the Sending pages (Admin → Sending servers for platform servers, App → Sending for a workspace's own servers). Copy them into your provider:
- Amazon SES: create an SNS topic, subscribe the SES webhook address to it (HTTPS), and send Bounce and Complaint notifications from your SES identity or configuration set to that topic. Mailorbit confirms the subscription by itself.
- Mailgun: Sending → Webhooks: add the Mailgun address for Permanent failure, Temporary failure and Spam complaints.
- Postmark: your server → Webhooks: add the Postmark address with Bounce and Spam complaint turned on.
Set WEBHOOK_KEY in .env to protect these addresses; the key is already part of the address shown on the Sending pages.
A hard bounce marks the contact as bounced; a complaint marks it complained and unsubscribes it. Neither is ever emailed again by campaigns or automations.
8. Payments (Stripe)
Without Stripe keys, customers change plans with a demo payment (no card), which is useful while you test. To take real payments:
- In the Stripe dashboard, copy your secret key (dashboard.stripe.com/apikeys) into
STRIPE_SECRET_KEY. - Developers → Webhooks → Add endpoint:
https://mail.yourdomain.com/api/stripe/webhookwith the eventscheckout.session.completed,invoice.paidandcustomer.subscription.deleted. Copy its signing secret intoSTRIPE_WEBHOOK_SECRET. - Restart:
docker compose up -d.
Plans are monthly subscriptions. Mailorbit creates the price in Stripe Checkout from the plan's price, or uses a Stripe price ID if you enter one on the plan (Admin → Plans). Customers manage their card and invoices in the Stripe customer portal from Billing. Turn on the customer portal once in Stripe: Settings → Billing → Customer portal.
9. Using Mailorbit
This section is also a guide you can share with your customers.
Contacts
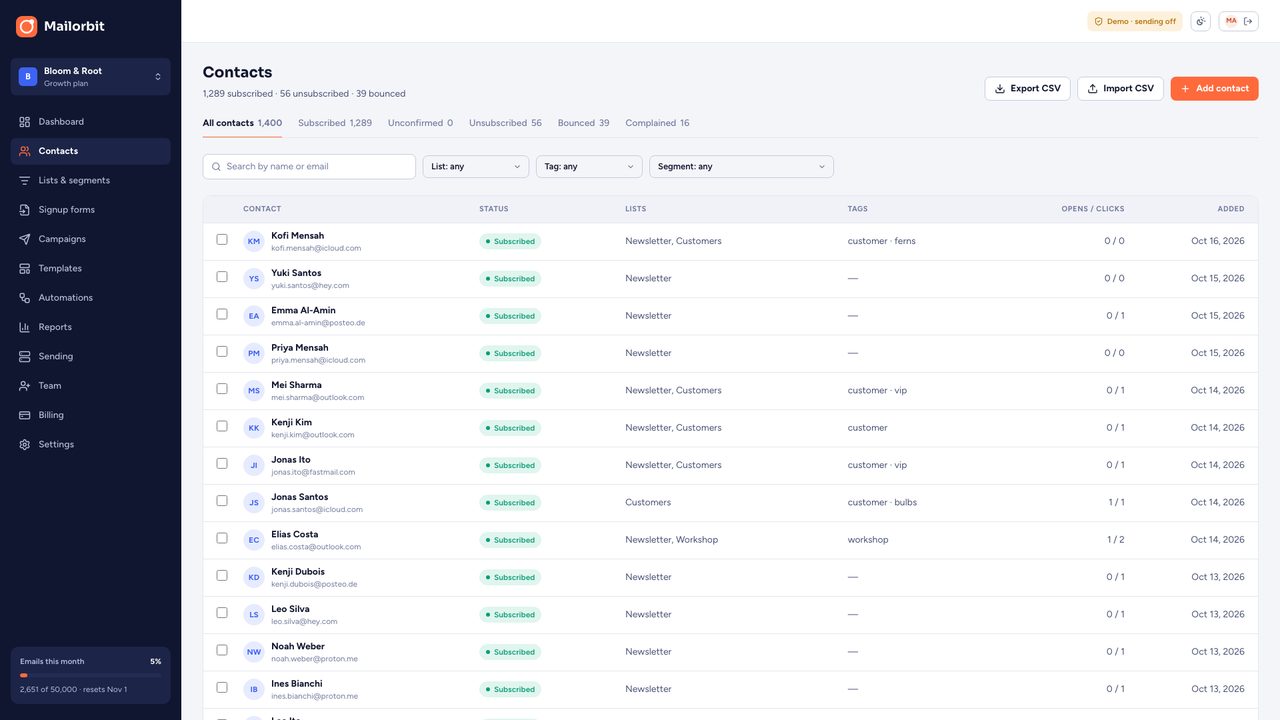
Add contacts by hand, import a CSV, or collect them with signup forms. Each contact has a status (subscribed, unconfirmed, unsubscribed, bounced or complained), lists, tags, custom fields, notes and an activity history. Only subscribed contacts receive campaigns and automations.
Import a CSV
Contacts → Import CSV: upload a file with a header row, match each column to a field (email, first name, last name or a custom field), choose lists and tags, and start. The worker imports in the background; invalid and duplicate rows are skipped and counted. Existing contacts are updated, never re-subscribed if they unsubscribed.
Lists and segments
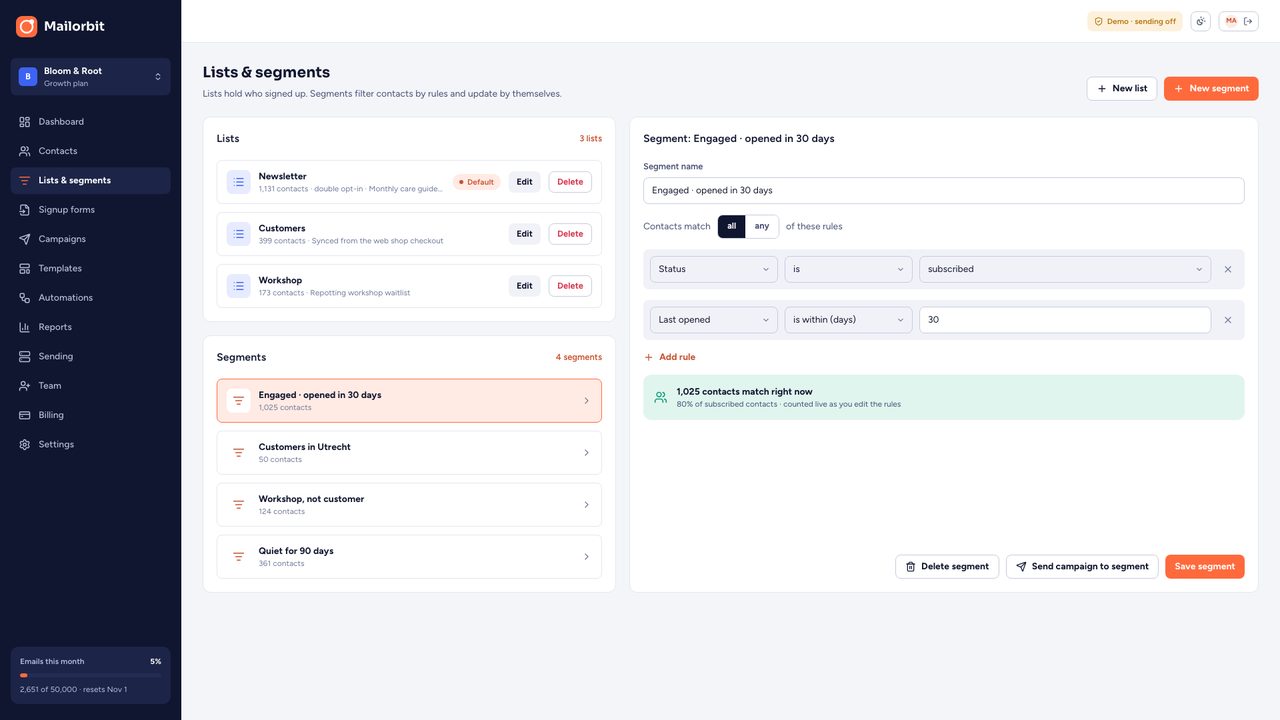
A list is a group people join (a newsletter, customers, a waitlist). A segment is a saved filter with rules on fields, tags, lists, dates, engagement (opened or clicked in the last N days) and campaigns (received, opened, did not open, clicked). The count updates while you edit the rules. Send a campaign to a list, a segment, or a list narrowed by a segment.
Signup forms
Signup forms → New form: pick the list and tags, the fields, the texts and the colour, and turn on double opt-in if you want new people to confirm by email first. Put the form on any website in one of three ways:
- Inline HTML: paste the code into a page; it posts straight to Mailorbit.
- JavaScript popup: one script tag shows the form as a popup after a delay, once per visitor.
- Hosted page: a link to a page on your platform, ready to share.
Every form has a hidden spam trap and an optional consent checkbox. Views and signups are counted.
Templates and the email builder
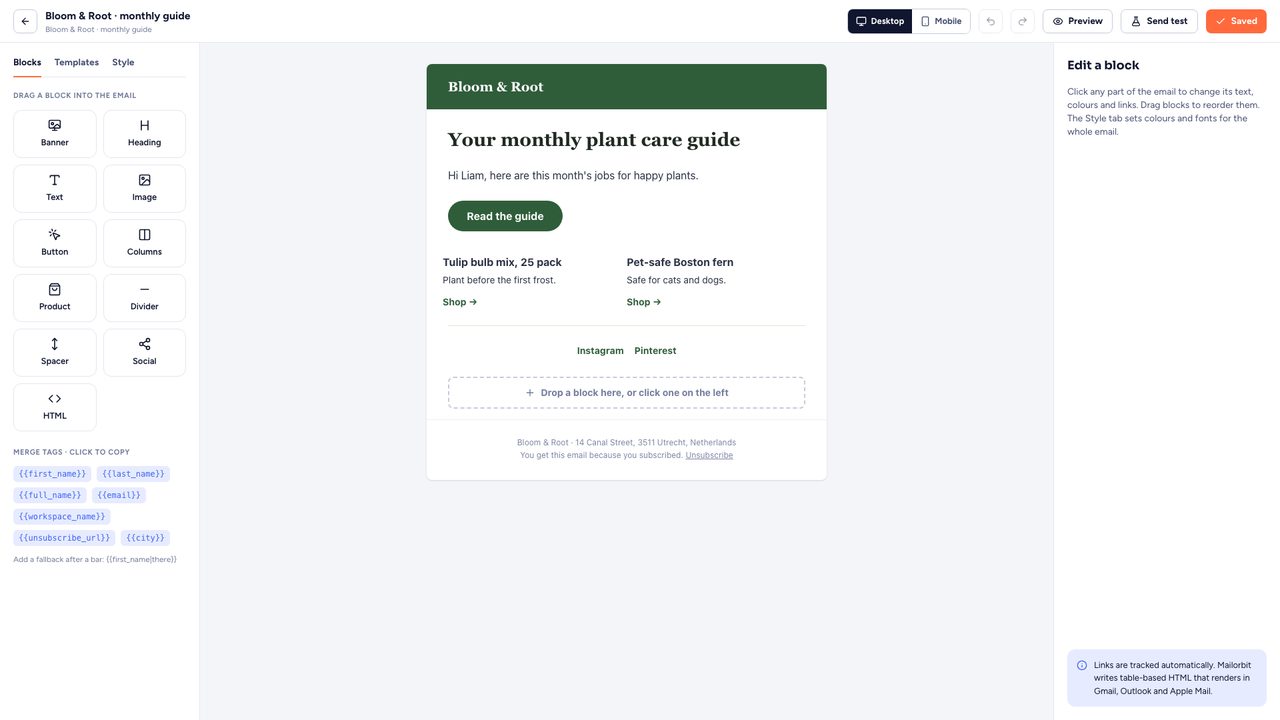
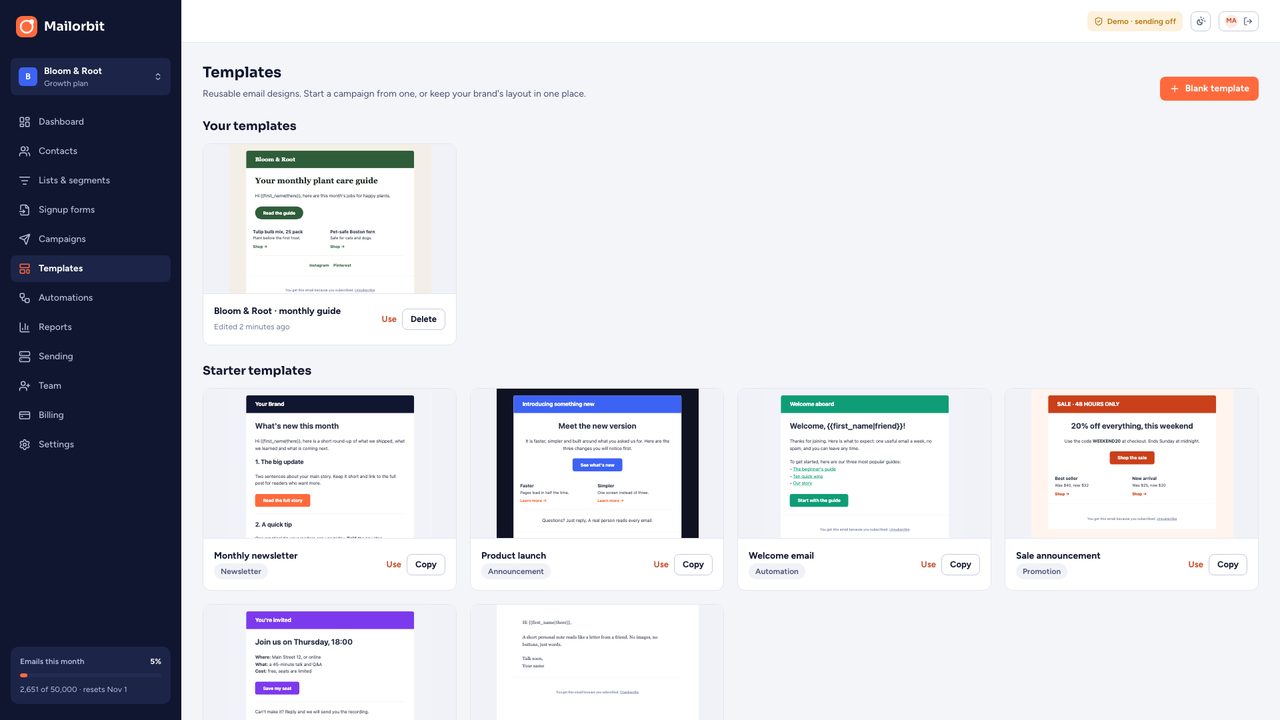
Templates → New template, or the Content step of a campaign, opens the builder. Drag blocks from the left into the email (or click a block to add it): hero, heading, text, image, button, columns, product, divider, spacer, social links and HTML. Click a block to edit it on the right; use the toolbar to move, duplicate or delete it. The Style tab sets the colours, fonts and width; the Templates tab starts again from a template. Preview shows desktop and mobile. Undo and redo work with Cmd/Ctrl+Z and Shift+Cmd/Ctrl+Z.
Merge tags put contact data into the email: {{first_name}}, {{last_name}}, {{email}} and custom fields. Add a fallback after a bar: {{first_name|there}}. The footer with the unsubscribe link and the postal address is added to every campaign email automatically.
Campaigns
- Recipients: lists, a segment, and a segment to leave out. The live count shows who will get it; nobody gets it twice.
- Content: the email builder.
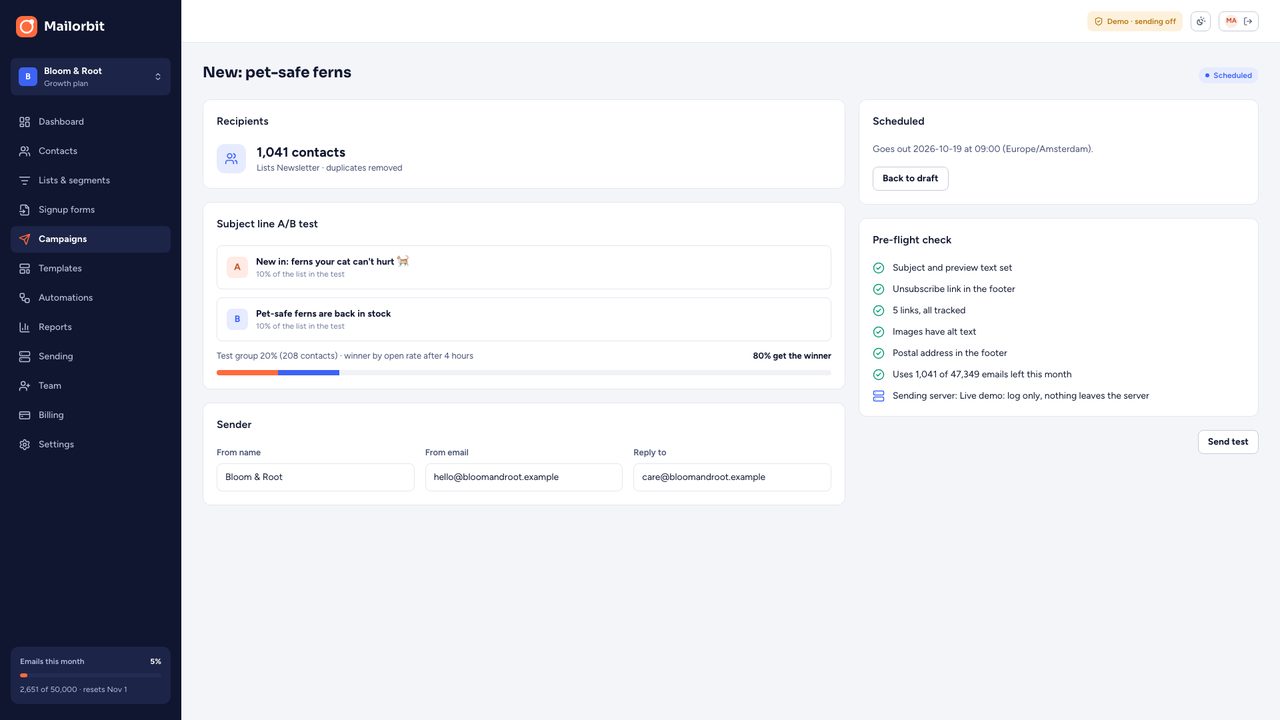
- Subject and A/B test: the subject, the preview text and the sender. Turn on the A/B test to try a second subject on a test group (for example 20%); after the waiting time the subject with the better open or click rate goes to everyone else.
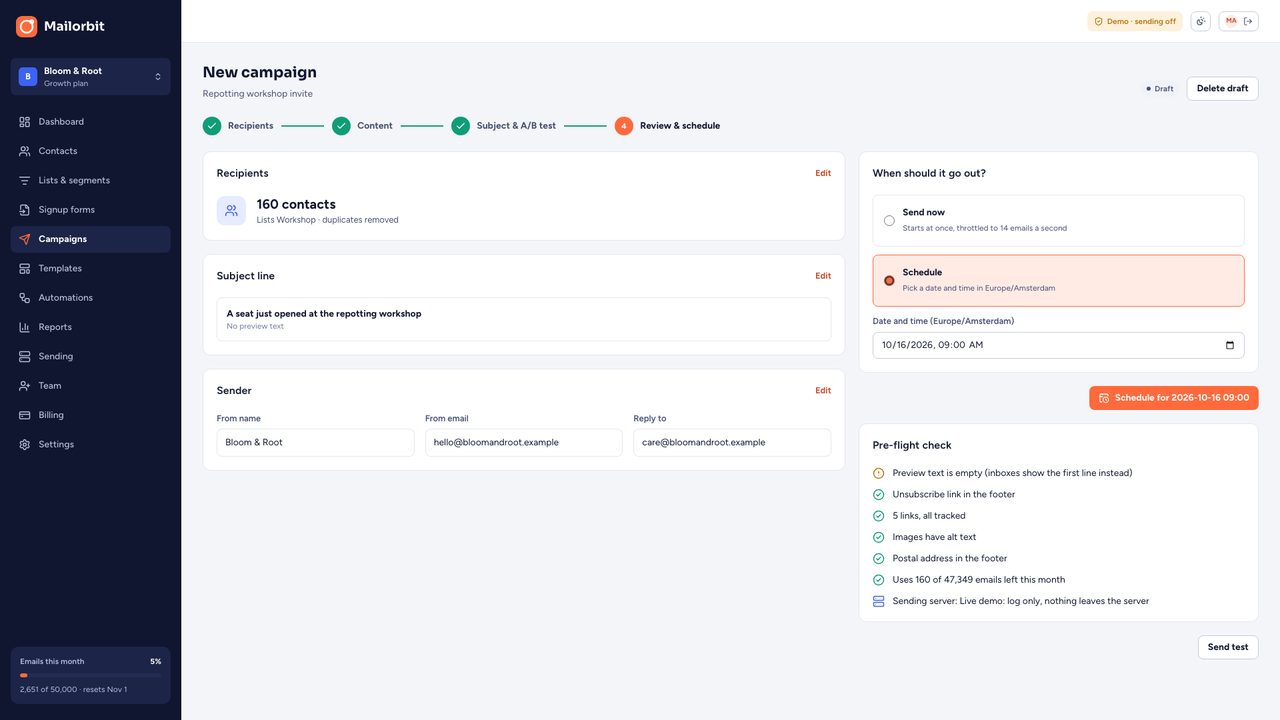
- Review and schedule: a pre-flight check (subject, links, alt text, address, enough emails left this month), then Send now or Schedule in the workspace's time zone.
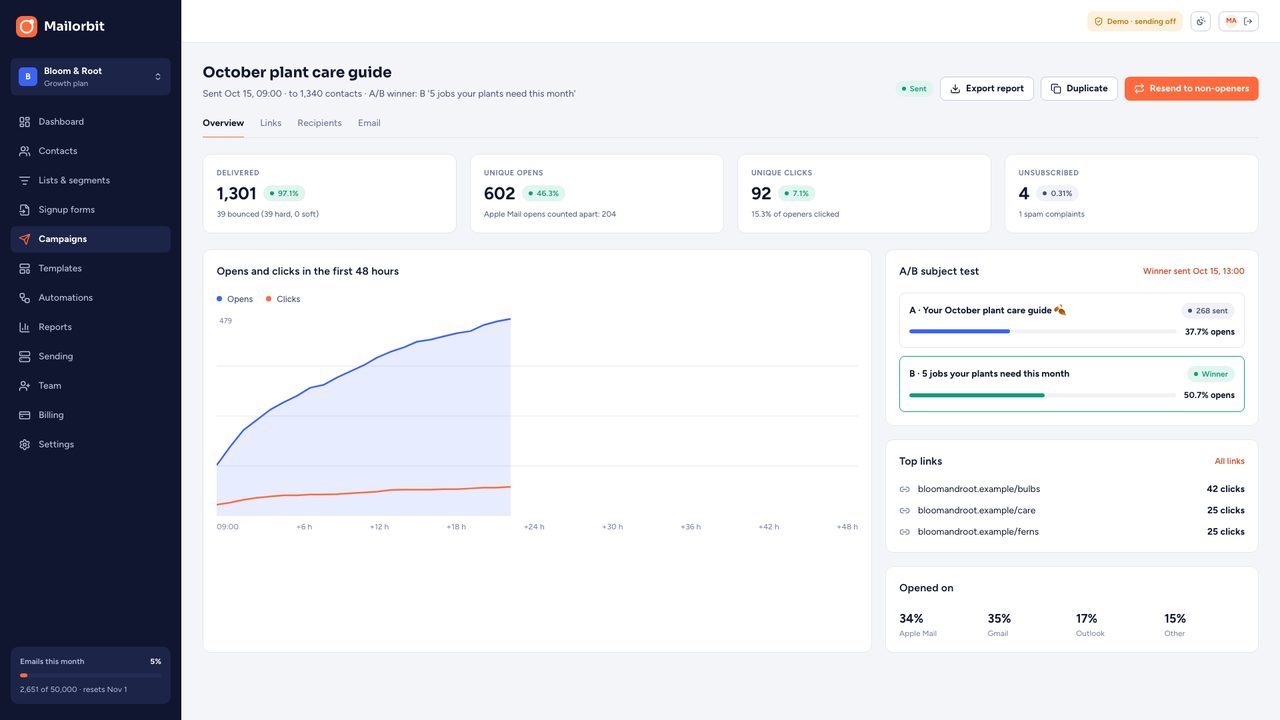
While it sends, the report fills in: delivered, opens, clicks, unsubscribes, bounces, the A/B result, top links and email clients. Pause, resume or cancel any time. Resend to non-openers makes a copy for the people who did not open. Export the report as CSV.
Automations
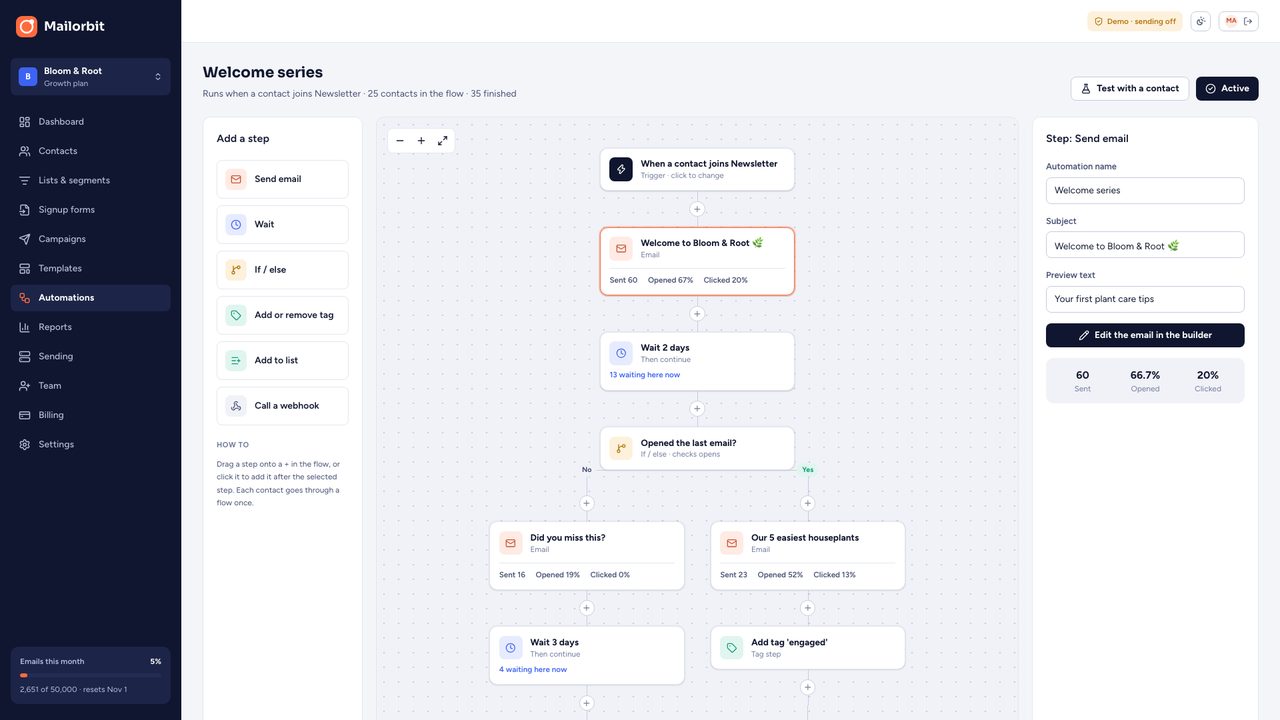
Automations → New automation (or start from the welcome series preset). Choose a trigger: a contact joins a list, a tag is added, someone fills in a form, or you start it from a contact's page. Add steps from the left or with the + between steps: send email, wait, if/else (opened or clicked the last email, has a tag, is in a list), add or remove a tag, add to a list, or call a webhook. Save, then turn it on. Each contact goes through a flow once. The numbers on each step show who is waiting there and how its emails perform. Test with a contact runs the flow for one address.
Reports
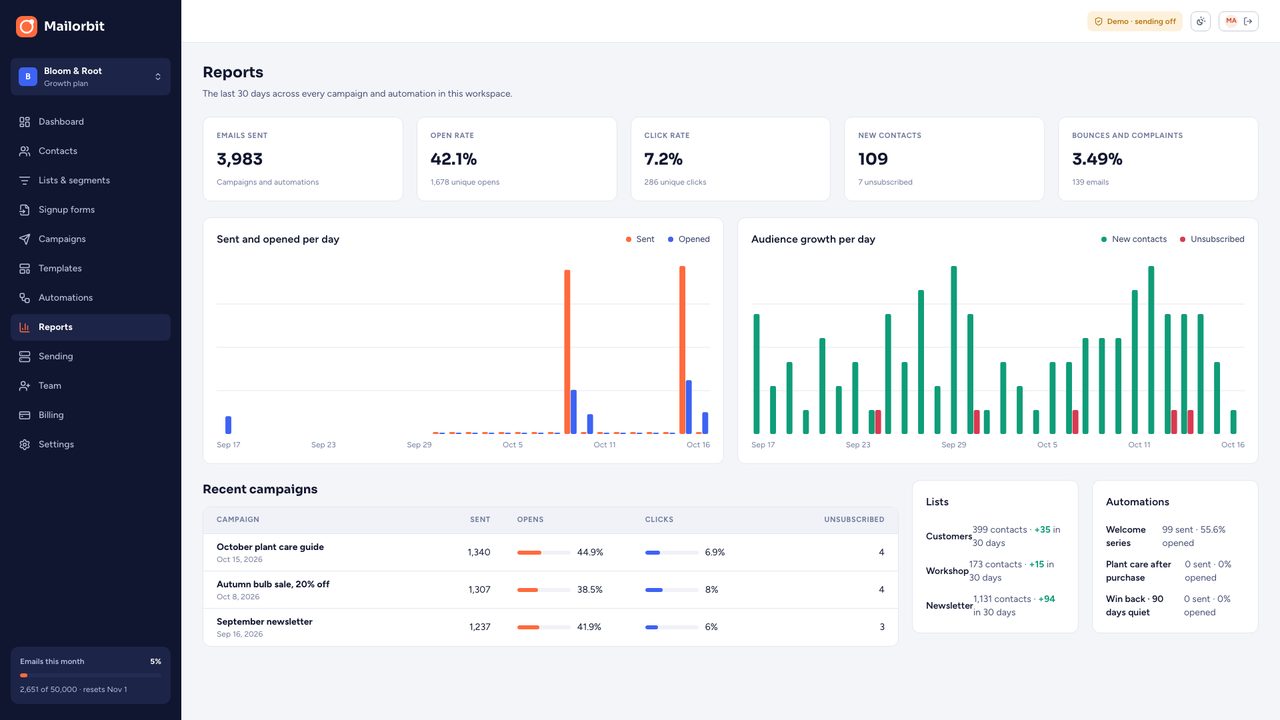
Reports shows the last 30 days for the workspace: emails sent, opens, clicks, new subscribers and unsubscribes per day, recent campaigns, lists and automations.
Team
Team → Invite someone sends an email invitation. Roles: owner (everything, including billing and deleting the workspace), admin (manages the team, sending servers and settings), editor (builds and sends: contacts, forms, templates, campaigns, automations) and viewer (reads everything, changes nothing). The plan sets how many seats a workspace has.
10. Running the platform
- Overview: revenue, workspaces, emails sent this month, bounce and complaint rates, latest payments and the state of the sending servers.
- Workspaces: search every workspace, open it as its owner sees it, change the plan, reset the monthly allowance, suspend or delete it.
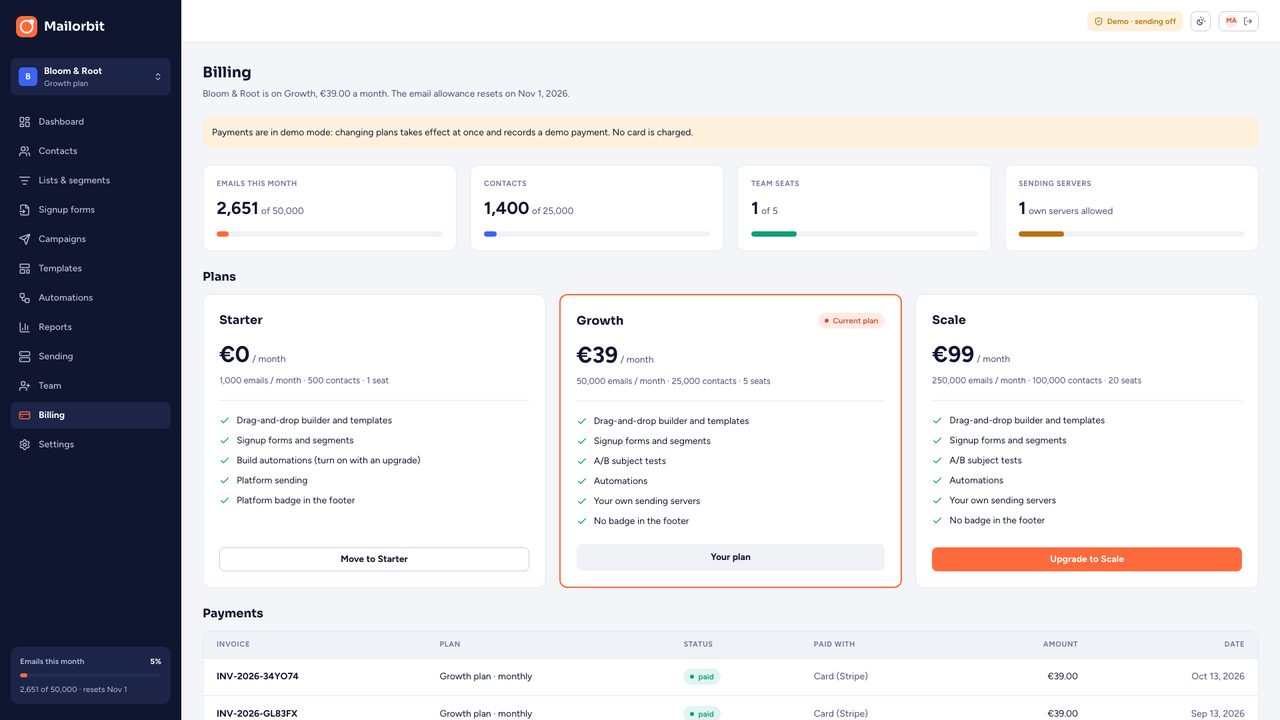
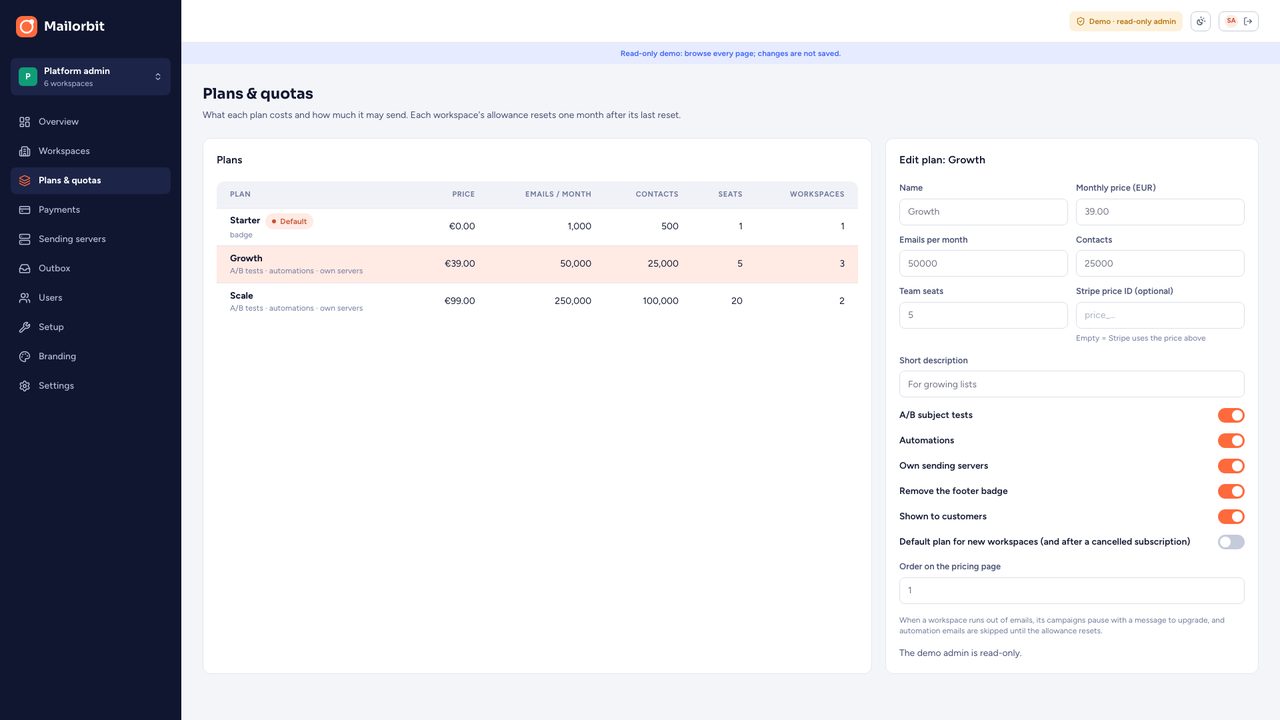
- Plans and quotas: price, emails per month, contacts, team seats, and features (A/B tests, automations, own sending servers, removing the platform badge from forms and emails). One plan is the default for new sign-ups. When a workspace runs out of emails, its campaigns pause with a message to upgrade, and automation emails are skipped until the allowance resets.
- Payments: every payment with its invoice number; mark one refunded after you refund it in Stripe.
- Sending servers: the platform servers, the default one, rate limits, tests and the bounce webhook addresses.
- Outbox: emails sent through the Log only sender, ready to open. Handy while you test.
- Users: everyone with an account; make someone a platform admin or delete them.
- Setup: see section 12.
- Branding: see section 11.
- Settings: whether anyone can sign up and create a workspace, the currency, the address system emails come from, and your terms of service and privacy policy (shown at
/termsand/privacy).
11. Rebrand: logo, colours, fonts
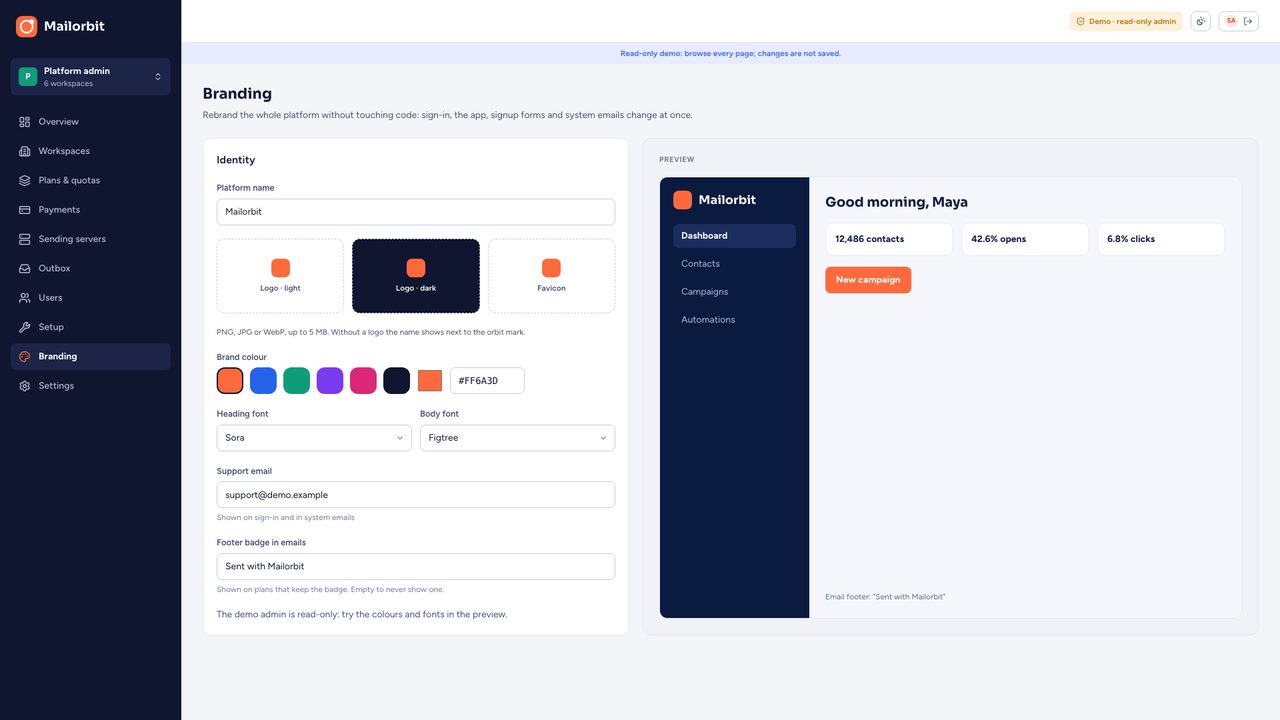
Admin → Branding changes the whole platform (landing page, app, admin, signup forms and system emails) without touching code: platform name, logo for light and dark backgrounds, favicon, brand colour, heading and body fonts (Sora, Figtree, Inter or DM Sans, all bundled), support email and the badge text in email footers (shown on plans that keep the badge). The preview on the right shows the result before you save. Reset to default goes back to the original look.
The landing page text lives in web/src/app/page.tsx if you want to rewrite it (section 14).
12. Setup check
Admin → Setup lists every service with its state: Working, Check (it works, but on a safe fallback such as Log only or demo payments), Optional (not set) or Needs action. The Test buttons check each connection, and Send a test email sends through the platform's default server. The same check runs in a terminal:
# with Docker, in the deploy folder:
docker compose exec worker pnpm setup:check
# without Docker, in the web folder:
pnpm setup:check
pnpm setup:check lists missing keys and tests the database, the worker, the default sender and Stripe; it exits with an error when something required is missing.
13. Every key, explained
Keys go in deploy/.env (Docker) or web/.env (without Docker). Docker keys are read by Docker Compose only. After a change, run docker compose up -d again.
| Key | Required | Where | What it does |
|---|---|---|---|
| Core | |||
DATABASE_URL | Yes | App | PostgreSQL connection URL. The Docker stack builds it from the POSTGRES_* keys for you. |
APP_URL | Yes | App | Public address of your platform, no trailing slash. Tracking links, signup forms and unsubscribe links use it. |
APP_SECRET | Yes | App | A long random string (32+ characters). Signs sessions and links and encrypts sending-server keys. Never change it after setup. |
| Docker | |||
POSTGRES_DB | Yes | Docker | Database name the Docker stack creates. |
POSTGRES_USER | Yes | Docker | Database user the Docker stack creates. |
POSTGRES_PASSWORD | Yes | Docker | Database password. Letters and digits only (it goes into a URL). |
WEB_PORT | — | Docker | Host port for the web app (default 3000). |
DOMAIN | — | Docker | Your domain for automatic HTTPS with the bundled Caddy (--profile https). |
| Payments | |||
STRIPE_SECRET_KEY | — | App | Stripe secret key (dashboard.stripe.com/apikeys). Empty = plan changes use the demo payment. |
STRIPE_WEBHOOK_SECRET | — | App | Signing secret of the Stripe webhook that points at <APP_URL>/api/stripe/webhook. |
| Sending | |||
WEBHOOK_KEY | — | App | Shared key for bounce webhooks: add ?key=<value> to the webhook URLs you give SES, Mailgun and Postmark. |
| Storage | |||
UPLOAD_DIR | — | App | Folder for uploaded images (default ./uploads; the Docker stack uses a volume). |
| Worker | |||
WORKER_INTERVAL_MS | — | App | How often the worker looks for work, in milliseconds (default 2000). |
LOG_EMAILS | — | App | Set to false to stop the Log-only sender printing each email to the console. |
| Demo | |||
DEMO_MODE | — | App | Leave empty. "true" turns on the public-demo mode: one-click demo logins, nothing is ever sent, nightly reset. |
APP_SECRET after setup: it encrypts the saved sending-server passwords and signs every unsubscribe and tracking link already sent.14. Customising the code
You do not need to change code to run Mailorbit. If you want to, the project is plain Next.js App Router with TypeScript:
- Texts on the landing page:
web/src/app/page.tsx. - Colours and the design tokens:
web/src/app/globals.css(light and dark values). The brand colour is also set from Admin → Branding. - Starter email templates:
web/src/database/seed/templates.ts. - Email blocks: the HTML each block sends is in
web/src/lib/email/render.ts; the builder panels are inweb/src/components/builder/. - A new sending provider: add an adapter next to the others in
web/src/lib/server/senders/and list its fields insenders/types.ts. - The database:
web/src/database/prisma_client/schema.prisma. After a change, runpnpm prisma:migrate:devto create a migration.
After changing code, rebuild the containers: docker compose up -d --build.
15. File structure
mailorbit/
├── CHANGELOG.md
├── LICENSE.txt
├── deploy/                    Docker Compose stack (copy .env.example to .env)
│   ├── docker-compose.yml
│   └── .env.example
├── docs/                      this guide (HTML and PDF)
└── web/                       the app, admin, public pages, API and worker
    ├── Dockerfile
    ├── .env.example           for running without Docker
    ├── public/                favicon
    ├── e2e/                   browser smoke tests (Playwright)
    └── src/
        ├── app/               pages: / (landing), /app (workspace), /admin, /install, /f (forms), /t (tracking), /u (unsubscribe), /api
        ├── components/        shared UI, the email builder, charts
        ├── database/          Prisma schema, migrations, seed data
        ├── lib/               email rendering, segments, automation steps, time zones
        │   └── server/        sending, campaigns, automations, tracking, imports, payments, settings, setup check
        ├── scripts/           setup check in the terminal
        ├── tests/             test helpers
        └── worker/            the background worker
16. Development and tests
cd web
cp .env.example .env          # point DATABASE_URL at a local PostgreSQL
pnpm install
pnpm prisma:migrate:deploy
pnpm prisma:seed -- --base
pnpm dev                      # http://localhost:3481
pnpm worker # in a second terminal| Command | What it does |
|---|---|
pnpm lint | Biome lint and format check |
pnpm typecheck | TypeScript check |
pnpm test | Unit and database tests (Vitest). Each run uses a throwaway schema in DATABASE_URL's database and drops it afterwards. |
pnpm e2e | Browser smoke tests against a running server (E2E_BASE_URL, default http://localhost:3481). Run npx playwright install chromium once first. |
pnpm setup:check | Setup check in the terminal |
17. Updating
- Back up the database (section 5).
- Download the new version from CodeCanyon and unzip it next to the old one.
- Copy your
deploy/.envinto the newdeployfolder. If you changed code, carry your changes over. - In the new
deployfolder rundocker compose up -d --build. Migrations run on their own; your data stays in the Docker volumes.
Keep the same Compose project name (the folder name deploy, or name: mailorbit in the compose file) so Docker reuses the same volumes.
18. FAQ and troubleshooting
The page shows "Install" again, or the wizard does not open
The wizard appears only while there is no admin. If it does not open, check that migrate finished: docker compose logs migrate.
Emails do not arrive
Open Admin → Setup. If the default sender is Log only, the emails are in Admin → Outbox, not in inboxes. Otherwise use Test on the sending server and read the error. Check that the worker runs (docker compose ps; Setup shows "Worker: Working").
A campaign stays "Sending" or "Paused"
Paused campaigns show the reason at the top, for example "Needs 12,000 emails, 3,000 left this month". Raise the plan's allowance, reset it in Admin → Workspaces, or upgrade the workspace, then press Resume.
Opens and clicks are not counted
APP_URL must be the public address people can reach. Links in emails sent while it was http://localhost:3000 cannot be tracked.
Amazon SES says "Email address is not verified"
Your SES account is in the sandbox. Verify the sending domain and request production access in the SES console.
Port 3000 is already in use
Set WEB_PORT=3001 (or any free port) in deploy/.env and run docker compose up -d again.
How do I remove the sample data?
Admin → Workspaces → the sample workspace → Manage → Delete. Your own workspaces are not touched.
How do I make someone else a platform admin?
Admin → Users → the person → Make admin.
19. Credits
Mailorbit is built on open-source software. Thank you to their authors.
| Package | Licence | Link |
|---|---|---|
| Next.js, React | MIT | nextjs.org, react.dev |
| Prisma, @prisma/adapter-pg, pg | Apache 2.0, MIT | prisma.io |
| Tailwind CSS | MIT | tailwindcss.com |
| Lucide icons (lucide-react) | ISC | lucide.dev |
| Nodemailer | MIT-0 | nodemailer.com |
| AWS SDK for JavaScript (SES v2) | Apache 2.0 | github.com/aws/aws-sdk-js-v3 |
| Stripe Node.js library | MIT | github.com/stripe/stripe-node |
| Papa Parse | MIT | papaparse.com |
| Zod | MIT | zod.dev |
| next-themes, sonner, clsx, tailwind-merge, dotenv, tsx | MIT | npmjs.com |
| Sora, Figtree, Inter, DM Sans fonts (via Fontsource) | SIL Open Font License 1.1 | fontsource.org |
| Biome, Vitest, Playwright, TypeScript (development only) | MIT, Apache 2.0 | biomejs.dev |
The sample workspace "Bloom & Root", its contacts, emails and texts are invented for the demo. No photos are bundled.
20. Licence
Mailorbit is sold under the Envato Market licences (codecanyon.net/licenses/standard):
- Regular Licence: one end product that is free to its users, for example an email platform you run only for your own business or your own clients without charging them through it.
- Extended Licence: one end product that its users pay for. Selling plans to customers through Mailorbit (Stripe or any other way of charging the people who use it) needs the Extended Licence.
One licence covers one platform on one domain. See LICENSE.txt for details.
21. Changelog
1.0.0 — 2026-10-16
- First release: contacts, lists, segments, CSV import, signup forms, drag-and-drop email builder and templates, campaigns with A/B subject tests and scheduling, automations, open and click tracking, bounces and unsubscribes, reports, team, plans with sending quotas, Stripe billing, admin panel, setup checks, branding, install wizard, sample data and the Docker Compose stack.
22. Support
Questions or problems? Use the Support tab on the item's CodeCanyon page. Please include your Mailorbit version, how you host it (Docker or not), and what Admin → Setup shows. Support covers installing, configuring and bugs; custom changes are not included.
Thank you for choosing Mailorbit.